Clay is in the soil layer under our feet in many parts of the country. Creeks and rivers cut through the soil and expose it. Construction sites and roadwork produce hard chunks of clay soil drying in the sun. If you take your troop rafting, canoeing or tubing, you can often find clay in the riverbanks you pass. If you stay at a scout camp, the counselors often know where it can be found. Finding clay is the first step here: there is a nice discussion of how to find clay in Kiko Denzer’s book “EARTH OVEN” available from handprint press, since it’s used to build wood fired pizza and bread ovens (but that’s another project, see that HERE)
When I camped with my troop, I often took a ziploc bag in my kayak or filled my shoe with clay pulled out of a river of creek bank. We would make beads and fire them in the campfire and the girls could save them – some tied them to walking staffs – as a souvenir of the trip.
So: finding clay.
![IMG_5065[1]](https://i0.wp.com/kellysavino.blog/wp-content/uploads/2017/08/img_50651.jpg?w=162&h=162&crop=1&ssl=1 "IMG_5065[1]")
![IMG_5067[1]](https://i0.wp.com/kellysavino.blog/wp-content/uploads/2017/08/img_50671.jpg?w=162&h=162&crop=1&ssl=1 "IMG_5067[1]")
![IMG_5103[1]](https://i0.wp.com/kellysavino.blog/wp-content/uploads/2017/08/img_51031.jpg?w=162&h=162&crop=1&ssl=1 "IMG_5103[1]")
Clay looks slick and slippery when wet, rock hard and broken in angles or mud cracks when dry. Scouts will approach it cautiously, but will likely end up smeared with clay and loving it. I watched one shy child up to her ankles in clay with mud caked hands shrug, and reach up to draw tribal stripes on both of her cheeks with clay – and soon they all were sliming each other, rubbing clay on their arms and legs, and thoroughly enjoying getting dirty.
- Clay is not just dirt. There are facial masks made of clay, spa treatments, and some tribal people use clay on their skin for ritual purposes or to repel mosquitos or prevent sunburn.
- Girls use clay every day. They will offer up dishes as example of clay in their homes, but remind them that their sinks and toilets are kiln fired porcelain – as are their parents’ capped teeth or grandparents’ dentures. There is clay in makeup, toothpaste, foods that list “bentonite”, medicines like Kaopectate (Kaolinn clay + pectin). Bricks are made from (often local) clay so their schools and the big buildings downtown are really large square pieces of pottery.
- Ask if they ever tried to dig a hole and fill it with water. What happened? If there are ponds near your area farms, they are often made by bulldozers digging down to the layer of clay, then smearing clay up the sides of the pond to waterproof it. Clay is waterproof – (THIS IS WHY WE CLEAN UP IN A CREEK, AT A HOSE OR OUTDOOR SPIGOT and not in a bathroom or kitchen sink, because large amounts of clay will waterproof drains as well. )
So: bring the clay back to camp. It will be full of rocks and sticks and roots, so it needs to be “refined”. This is because clay shrinks when dried or fired, and pebbles do not – so anything you make will crack if it has a stone in it.
There are a couple of ways to refine clay, depending on the weather, the length of your stay and the size of the project.
1.) Have the girls roll or squeeze the clay into long coils (snakes) and lay them out in the sun on a picnic table, board or big rock or log. These will dry quickly, and can be crushed (with rolling pins, stones, or by walking on them with shoes on a board) and the resulting bits sifted through a wire colander or (if you are backpacking) they can just pick out pebbles and sticks. The powdery crumbly stuff can be rehydrated the way you would with bread dough — enough water to make it workable, kneaded on a pile of clay dust “flour”.


When it’s time to make things out of clay: Rules and explanations
- Earthenware clay was used for pottery since prehistoric times – and lasts for thousands of years once fired. Art museums have examples of pottery that dates back to the earliest records of human life, and often it’s the only thing – besides stone and bones — remaining as a clue to how people lived. But earthenware is not like the stoneware or porcelain we use for dishes – it is more like the clay in a terra cotta plant pot or a brick. It can be stiff and sandy, and crack when it starts to dry out.
- Simple forms work best – solid and small with no attachments. I usually bring bamboo skewers to help with making beads and small pendants – but insist on one piece beads, and caution the girls that anything with parts attached or sticking off the sides will likely not survive.
- Finished pieces are strung on loops of wire to keep them together. They will dry that way. IMPORTANT: clay pieces have to be thoroughly dried or they will pop like popcorn when put in the fire! I don’t care what your art teacher told you, air bubbles do not make clay explode: steam does. Many hours in the hot sun, on a dark surface if possible — or in a camp oven at 200 degrees (no hotter) for a couple of hours should do it.
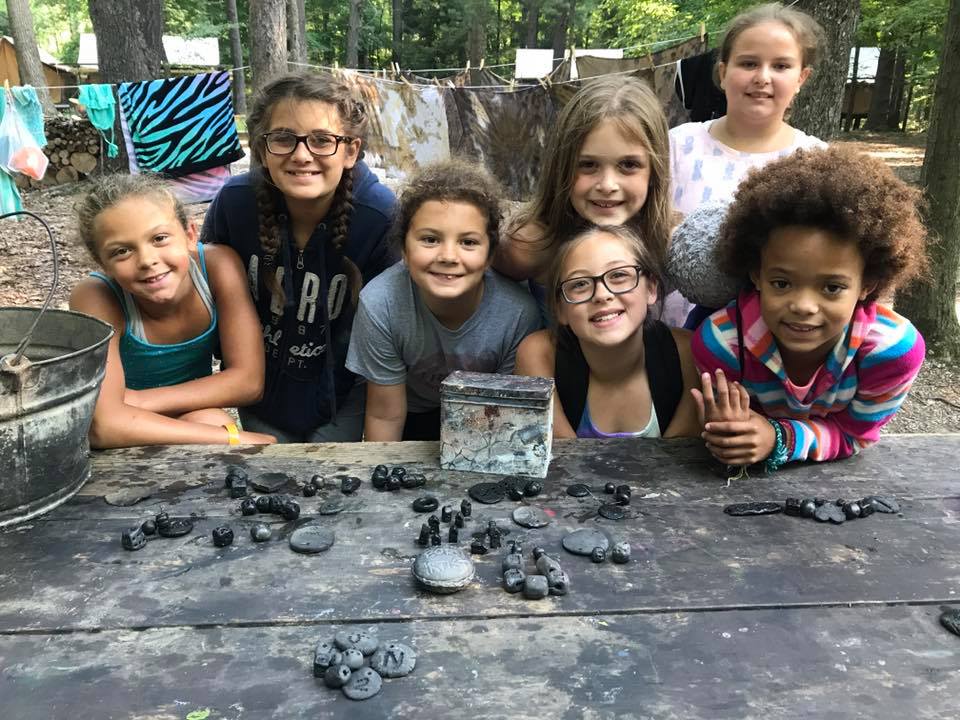
- Every girl makes a small pendant with her initials or count off number. This will be fired on a twist of wire with all her other work so she can identify it after the firing.


Firing: If you are backpacking, keep a can from your food and fire inside of it. You can put in some dried leaves and pine needles and such or dry moss to make interesting marks. Beads will finish in a variety of ways, depending whether they got exposed to oxygen: black, grey, browns, reds and smoky colors. If you can bring along a can with a tightly fitting lid (a cookie tin or metal recipe box from goodwill, altoids tin, etc) you can load them inside and wrap it with wire to keep the lid tight for blackest black beads.
I wait until after meals are cooked on a fire (paint will burn off of the cans) and then put the beads NEAR the fire at first, listening carefully for the popcorn sound of a bead exploding. After a bit I move the can closer and then finally build the fire over and around it until it is right in the center of the fire. The longer it fires, the firmer the finished beads will be – but after an hour or so in the hottest part they should be permanent and last a few thousand years 🙂
In the morning you can sort through the ashes and find your treasures. Dip them in water to cool and remove ash. Often the wires will not survive the firing but should hold on long enough to identify whose are whose. Badgework tip: The Junior outdoor art badge requires a musical instrument. I rolled two pieces of clay into flat circles, and put them on plastic wrap, and pressed them wrap side down into the top edges of two same-sized cups so they made two little bowl shapes.
I asked the girls to make a very small bead with a letter on it that represents a wish they have for themselves or the troop or the world. I wrapped each one in a bit of toilet paper so they wouldn’t stick together and put them in one of the bowls. Then I scratched up the rims of both bowls (scoring) and put one upside down on the other like a closed clamshell, and pinched the edges shut. I poked little holes all around to let it dry and let the steam out and warned the girls that it might not survive firing (but it did).
After the firing, dunk beads in water to cool and wash off any ash.
There are ways to polish your beads before firing, using a burnishing tool or a clay slip concoction called Terra Sigillata, but that is a project for another post!


Leave a comment